Showing posts with label Order Management. Show all posts

Thursday, July 10, 2014

Interface Trip Stop Functionality

There are typically four interface program get triggered at the time of ship confirm. They are 
  • Interface Trip stop
  • Packing Slip Report
  • Bill of Lading
  • Invoice
Interface Trip Stop is one of the main interface programs which can be triggered at the time of ship confirm or later as Interface Trip stop - SRS concurrent request.

Interface trip stop has two parts
  • Order Management Interface (First part)
  • Inventory Interface (Second part)
Order Management Interface part update the order management tables like OE_ORDER_LINES_All (Update Shipped_Quantity, Shipping_Quantity, Actual_Shipment_Date) and also WSH_DELIVERY_DETAILS (make Released_status, OE_INTERFACED_FLAG = ‘Y’) table.

The Inv_Interfaced_Flag remains = X (Pending) or N which will changes to Y after execution of second part

The second part i.e. Inventory Interface will be triggered only if the value of OE_INTERFACED_FLAG = ‘Y’ otherwise second part will not be triggered. Even if you try to run this from SRS, these lines will not be picked for processing. 

Inventory Interface part move data from MTL_TRANSACTIONS_INTERFACE to MTL_MATERIAL_TRANACTIONS and MTL_MATERIAL_TRANSACTIONS is updated with Sales Order Issue transaction. Also data is deleted from MTL_DEMAND, MTL_RESERVATIONS and WSH_NEW_DELIVERIES. Item quantity reduced from MTL_ONHAND_QUANTITIES and 
MTL_TRANSACTION_ACCOUNTS is updated with accounting information.


Both these parts are executed simultaneously.

Wednesday, July 9, 2014

Shipping Parameters Quick Reference

Lets see Oracle Order Management Shipping parameter setups. Please note shipping parameters are inventory org specific where as Global parameters are not.

1) General Tab


#Weight UOM Class: Default Weight UOM class used in shipping from this Organization V1.
#Volume UOM Class : Default Volume UOM class used in shipping from this Organization V1.
#Percent Fill Basis : Select Percent fill basis from Quantity, Volume or Weight. This is the used to determine whether or not container met there minimum fill percentage.
For Weight or Volume, the calculation uses the physical attribute of item and container in Inventory and for Quantity, the calculation uses the Container Load Relationship details to determine the maximum number of items that will fit into the container.

#Export Compliance Screening: is used to enforce export compliance screening at Delivery Creation, Ship Confirm, or At Delivery creation and Ship Confirm
#Enable Workflow : This is used to enable workflow for delivery. You can configure workflow to achieve specific task like sending notification for over ship or backorder to a user
#Raise Business Events: This check box is used to enable business events.
#Enable Ship to Deliver Workflow: If you want to use ship to deliver workflow then enable this box here

2) Pick Release


# Release Sequence Rule : You can define release sequence rule at OM>Setups>Shipping>Picking>Define Release Sequence Rule. This is used to specify the Order in which delivery lines are allocated inventory.
# Pick Slip Grouping Rule: You can define release sequence rule at OM>Setups>Shipping> Pick Slip Grouping Rule. This rule specify how release delivery lines are grouped on Pick slip. Both above rules are default only and you can change them during pick release
#Print Pick Slip:  This specify when you want to print pick slip.
At the End: Pick slip will be printed at the end of the pick release process.
Immediate : In this case you must specify the "Number of Pick Slip lines". Once the threshold is reached it will start printing
# Number of Pick Slip lines:  This is used specify the number of lines will print on each pick slip and is mandatory when Print Pick slip is set to Immediate.
# Default Pick Release Document set: This is the default document set which is printed for pick release. You can change its value at the time of pick release.
Default Stage Subinventory/Locator: Pick Confirm (Transact move orders) transfer material to this subinventory/Locator.
# Auto Create Deliveries: If this is selected then pick release auto create deliveries based on delivery grouping rules. You can override this option at the time of pick release.
# Auto Allocate: If this is selected then pick release automatically create and transact move orders. You can override this option at the time of pick release
# Enforce Ship Set and Ship Model: If this is selected then all ship lines in ship set or ship model will be released nor back ordered together.
#Plan Task: this is enabled if Warehouse management is used.
#Pull Replenishment: This is used to fill up a locator up to maximum capacity when there is a shortfall. this is also used with WMS.
# Retain Unstated Quantity during over pick:This is used to retain unstaged quantity during over shipment. We will see the effected of this in another post.

3) Shipping Transactions


# Default Ship Confirm Document Set: This is a document which are printed at ship confirm.
# Ship Confirm Rule: This is default auto ship confirm rule.
#Auto pack Option: If this is Yes then delivery lines are packed based on item container relationship
and if this is set as Autopack master then container further packed in another container such as frieght container for transport.
#Good Dispatch Account : The sales order issue transaction uses this account if the Oracle Order Management workflow cannot determine one.
#Enforce Packing in Containers: if yes, ship confirm displays a warning when confirming a delivery or trip with unpacked delivery line items.

4) Delivery


# Delivery  Grouping Attribute: This is used to select attributes for grouping of delivery lines.
#Autocreate Delivery Criteria: If you have enabled auto create delivery in pick release tab then thi sis used specify the criteria for that. Across Order means all selected delivery lines that match on the Delivery Grouping Attributes across orders are eligible to appear on one delivery.
#Append Limit: This is used to indicate the point at which you want to stop the system from adding lines to a delivery.

If you are using Oracle transportation Management then use other parameters

Thanks
Mandeep


Monday, June 23, 2014

Item Orderability Rules in Order Management

Item orderability is a new feature that Oracle introduced in order management release 12.1. Based on these rules, a user can restrict items that can be entered on sales order by manual or EDI, XML, Etc.

Setups

  • Define an Orderability Rule 
  • Set the Profile OM: Use Materialized View for Items LoV 
  • Run Refresh Order Management Materialized Views 

Step 1) Define an Orderability Rule

Navigate to OM>Setup>Rules>Item Orderability

Item Orderability Rules in Order Management


# Select an Operating Unit
# you can set this rule at item level or Category Level
# Check Enabled to enable this rule
# If Generally available is ticked, then item is available to all except the criteria mentioned in rule.
and if Generally Available is not ticked then item is restricted to all, except the criteria mentioned in the rule.

Here in above example, the item is available to all customers except to "w_Enterprise Builders"

# Rule Level

There are 11 Levels at which you can set the item Orderability Rule

These are

  1. CUSTOMER 
  2. CUSTOMER CLASS
  3. CUSTOMER CATEGORY 
  4. END CUSTOMER 
  5. ORDER TYPE 
  6. SALES CHANNEL 
  7. SALES PERSON 
  8. SHIP TO LOCATION 
  9. BILL TO LOCATION 
  10. DELIVER TO LOCATION 
  11. REGIONS


Step 2) Set the Profile OM: Use Materialized View for Items LoV 

If this profile option is set to "Yes", then sales order form will display the items which order not restricted by Item Orderability Rules

If this is set to NO, then system display all items but give a note when saving the sales order.

Its better to set this profile option as Yes

Step 3) Run "Refresh Order Management Materialized Views"

If the profile OM: Use Materialized View for Items LoV is set to Yes, the concurrent request "Refresh Order Management Materialized Views" needs to be run in order to refresh OM materialized views OE_ITEMS_ORD_MV, OE_ITEMS_MV.

The concurrent request needs to be run after changes are made to the item master, cross reference, Customer Items or to the item orderability rules, to ensure that the item list of  values displays the latest items on the order entry form, based on orderability rules.

Test Case

Let try to enter a order for item Steel123 based on above rule it should restrict us


Thanks
Mandeep

------------------------------------------------------------------------------------------------------------------------------------------------------------------
Please share this knowledge with your friends and subscribe at our blog for more updates. If you have any queries, please participate in our Forum or by leaving your comments below.
------------------------------------------------------------------------------------------------------------------------------------------------------------------


Thursday, June 12, 2014

Drop Ship Order Flow

Here is a block diagram of Drop Ship Order Flow

Drop Ship Order Flow


Back to Back Order Flow

Please refer below diagram for Back to Back Order flow in Oracle apps


Back to Back Order flow

Monday, June 2, 2014

Order Management Data Flow

Order Management Data Flow


Thanks
Mandeep
------------------------------------------------------------------------------------------------------------------------------------------------------------------
Please share this knowledge with your friends and subscribe at our blog for more updates. If you have any queries, please participate in our Forum or by leaving your comments below.
------------------------------------------------------------------------------------------------------------------------------------------------------------------

Order Management and Shipping Concepts and interview Questions

What is a Delivery?

A delivery consist of delivery lines that are scheduled to be shipped to customer ship to location. You can manually or automatically create a delivery and group lines. A delivery can have delivery lines from multiple sales order.

You can control Auto create Delivery in Shipping Parameters Pick Release tab and Delivery Grouping criteria in delivery tab.

What is a Pick Release?

A Pick Release is to release eligible delivery lines for picking material to full a customer order. When you pick release, system find eligible delivery lines to be released for picking based on release rules and create a pick slip report which then handed over to operator for picking

Picking rules: Specify which material to be picked based on picking rules defined i n oracle inventory. This is used to help system determines Pick from Sub inventory/Locator.

Release sequence Rules: This specify the order in which eligible delivery lines are released on shop floor. This is based on the following:
  • Order number
  • Outstanding invoice value
  • Scheduled date
  • Departure date
  • Shipment priority

What are the methods of Pick Release?

  • Online Mode: It pick Release immediately without waiting for the order to process through the concurrent manager. You can see this option when releasing sales order from release sales order form. 
  • Concurrent : This enable you to run pick release in background along with other request.
  • Standard Report Submission: SRS you call it. You can schedule this program and it runs  in the background several time in a day.
  • Shipping Transaction Window: You can use action button in shipping transaction form to pick release.

What are Trips? (refer : OracleUG)

A trip is an instance of a specific freight carrier departing from a particular location containing deliveries.

A trip is carrier specific and contains at least two stops such as a stop to pick up goods and another stop to drop off goods, and may include intermediate stops. Trips can be created automatically or manually.

Automatic
If your shipping process does not require advanced planning, you may prefer to automatically create trips:

Auto-creating a trip for a delivery: You can find the delivery you want to ship, and auto-create a trip and related trip stops.
Auto-creating a trip for containers and lines: You can find the lines and containers you want to ship and auto-create a trip which creates a trip, related deliveries, and trip stops.

Manual
During transportation planning, you can manually create a trip and later assign delivery lines or find the delivery lines and create a trip. For example, for a regular trip scheduled to depart every Friday, you can manually set up a trip ahead of time and then assign delivery lines. When you manually create a trip, you can manually assign stops, deliveries, and delivery lines to that trip.


What is Item Cross Reference?

Item cross reference is used to link our item with supplier or customer item. 

What is a Modifier and what are different types of Modifiers?

A modifier is used to adjust the price on sales order lines. It includes adjustments, benefits, Freight and special charges. Examples : Discount List, Freight and Special Charges, Promotion surcharge.

What are defaulting Rules?

Defaulting rules helps us to automatically default some information from various sources there by reducing the effort in entering some of the information in order management. For example when you enter a Customer on sales order Ship to, Bill To, Price list etch automatically defaults form customer level setting. Deafuling rules navigation is OM>setup>Rules>Defaulting

Customer sites are controlled at what level?

Customer sites are controlled at operating unit level where as customer are at Business Group Level

What is ATP and why we use it?

ATP Stands for Available to Promise. Its is a business function which can be used to find out the available quantity when customer give a request.

ATP=On Hand + Supply - Demand
On hand: Netable on Hand quantity
Supply : Planned Order, Scheduled Receipts, Discrete Jobs
Demand : Sales Orders, Discrete Jobs

You can refer below link. there is excellent slide by apps learn http://applearn.blogspot.in/2009/03/available-to-promise-atp-in-oracle.html

What is an RMA?

RMA stands for Return Material Authorization. It used to receive material back from customer if ther eis any defect. You can configure approvals for RMA.

Whats is a credit check functionality in Oracle Order Management?

Please refer http://mandeeporacle.blogspot.com/2014/03/credit-check-functionality-in-order.html


Whats is Over Picking?

Over picking is used to pick more than what is ordered and you can define over pick tolerances at item level in order management tab or in profile option OM: Over Shipment Tolerance

How to Ship in fastest way?

Check the Autodetail option in Pick Release.  Set the profile INV: Detail Serial Numbers to ‘Yes’. Inventory will then suggest serial numbers during the Detailing process.  Do not check the Pick Confirmation Required flag in the Organization Parameters form. there by avoiding picking conformation step

Can you update the Sales Order once it is Booked?
It depends on processing constraints set up in Order Management. Some of them are seeded and can not be modified but some you can configure on your own.

What are the prerequisites of the Sales Order?

You need to define Customers, Price List and Transaction Types.

What are different order types?
  • Order
  • Return
  • Mixed

Additional reading - > 6 benefits of automating procurement

Thanks
Mandeep

------------------------------------------------------------------------------------------------------------------------------------------------------------------
Please share this knowledge with your friends and subscribe at our blog for more updates. If you have any queries, please participate in our Forum or by leaving your comments below.
------------------------------------------------------------------------------------------------------------------------------------------------------------------

Thursday, May 8, 2014

Attachments in Order Management

How to configure automatic Attachments in Order Management

Lets see how we can add automatic attachment in in Order Management

Step 1) Please Make sure OM: Apply Automatic Attachment set to Yes


Step 2)  Navigate to OM>setup>Orders>Attachments> Document


Enter New category : Mandeep Test category
Default Data type: Long Text
Optionally specify the Start Dates

Step 3) Click On assignments Button


Select Type as Form and names as Sales Order form

Step 4) Now Navigate to OM>Setup>Orders>Attachment>Documents


Specify Category as Mandeep Test Category
Security : None
Optionally Select Start Dates
Enter a Text : Hi, Please let us know if you face any issue with the product.


Step 5) Click On additional Rules

Select entity as : Order Header
In rules select Attribute as Customer and Attribute Value as w_Enterprise Builders : 3477

Now this particular attachment will get applier to sales order created for w_Enterprise Builders


Test Case

Create a sales Order for w_Enterprise Builders : 3477 and click on the attachment button at header level


You can see our text appears in the attachment

Thanks
Mandeep
------------------------------------------------------------------------------------------------------------------------------------------------------------------
Please share this knowledge with your friends and subscribe at our blog for more updates. If you have any queries, please participate in our Forum or by leaving your comments below.
------------------------------------------------------------------------------------------------------------------------------------------------------------------


Sunday, May 4, 2014

Shipping Calendar

How to Work with Shipping Calendars

Suppose your organization actually Ship materials from a warehouse only on particular days. So how to prevent shipping from system. To achieve the same Oracle has provided functionality of shipping calendars. Lets take a test case and see how to define and assign the shipping calendar. Before that you can see in below screenshot that I can able to ship material on weekends also which will stop working after we complete our setup of shipping calendar


Define and Assign Shipping calendar

Step 1) Define calendar

Navigate to OM>Setup>Shipping>Calendar>Enter

Enter a Name of calendar "Shipping" and specify the Quarterly Type.


Click on Workday Pattern and specify 5 days ON and 2 days OFF.


You can also specify shifts and Timings etc if you want.

Next Go to Tools> Built to built the calendar


A request will get fired to built the calendar. Make sure it completes


Step 2) Assign Calendar

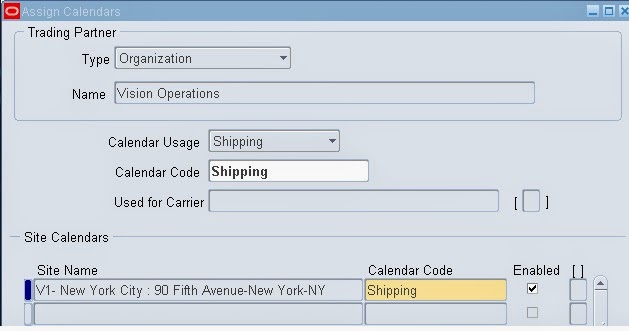
Next step is to assign calendar to warehouse. Navigate to OM>setup>Shipping>Calendars>Assign


Enter type as Organization, specify warehouse which is Vision Operations and Calendar usage as Shipping and Calendar code is calendar which we have defined in Step 1 i.e Shipping. Also Assign the site name and calendar code. These are shipping locations

Test Case

Now if you want to ship any delivery on weekend system will give you an error as shown in below screenshot


Thanks
Mandeep
------------------------------------------------------------------------------------------------------------------------------------------------------------------
Please share this knowledge with your friends and subscribe at our blog for more updates. If you have any queries, please participate in our Forum or by leaving your comments below.
------------------------------------------------------------------------------------------------------------------------------------------------------------------

Wednesday, April 23, 2014

Sales Order Defaulting Rules

Sales Order Defaulting Rules

Defaulting rules in Order Management determine how certain fields on sales order headers or sales order lines level will default.

Oracle apps provide both seeded and user defined defaulting rules. You can use defaulting condition templates to built your own rules and conditions to default these fields.

Navigation: OM>SetUps>Rules>Defaulting

A Defaulting rule Consists of following

  1. Defaulting Condition
  2. Precedence
  3. Default Source/value
  4. Source Type
  5. Sequence
Defaulting Condition


As the name suggest, this is the condition which validated at the time of defaulting. It is the first filter validated before a defaulting rule is applied.

Always: is the generic condition which is seeded and generic one.

You can use defaulting condition templates to define new conditions. We have defined a condition that when Warehouse is V1. So when where house is V1 condition is met we can default various filed.


Precedence

Precedence as name suggest, is the priority in importance. Lower the precedence, higher is the priority.


Here in above case Always has Higher priority than our condition "Mandeep Test Condition" as the precedence is lower.

Default Source/ Value

Default Source/Value is the value which system is going to get or default for the sales order header Customer field.

Here in above case we want when warehouse is V1, then ship to should default from sales agreement header values.


Source type

Source type is the type of the source from where the value will be defaulted


Reference  :  Oracle Metalink

Sequence

In Defaulting rules, sequence work as Precedence. Its the order in which defaulting take place. If same sequence then alphabetical order come into place


Thanks
Mandeep
------------------------------------------------------------------------------------------------------------------------------------------------------------------
Please share this knowledge with your friends and subscribe at our blog for more updates. If you have any queries, please participate in our Forum or by leaving your comments below.
------------------------------------------------------------------------------------------------------------------------------------------------------------------

Wednesday, April 16, 2014

How to Apply and Remove a Hold Source

How to Apply and Remove a Hold Source

Suppose you want to hold all current and future sales order for a Customer. to do so you have to create a hold source based on Customer and select conditions to hold all existing and future sales order for this customer.

Lets create a Order Source. Open Sales order Form and Navigate to Tools> Create Hold Source


Enter the criteria as shown in above screenshot. Previous to this step we have defined the hold named "Mandeep" which we Work Flow item is: OM Order Header and workflow activity: Book Order.

Now click on Hold Name


Click on Apply Hold. You will receive a message the Hold applier successfully

Now try to create a sales order for this customer using Order Management Super User responsibility navigate to Orders, Returns > Sales Orders

Enter sales order header for this customer. Click on Lines Item, you will get a error  'Hold Applied against order based on Customer'


Enter the line, save it and click on BOOK and receive the error in the Process Message form:  'A hold prevents booking of this order.'


You can see order will remain in entered state

Now after few days you want to Remove this hold source


Navigate to Order organizer form and click on Hold information > Hold Source


Query for your Hold based on Hold Name


To Release this hold you need to put a reason and then click on Release button

You will get a message that hold release successfully. Click OK


Now if you try to book our previous order you will face no issue


Thanks
Mandeep

------------------------------------------------------------------------------------------------------------------------------------------------------------------
Please share this knowledge with your friends and subscribe at our blog for more updates. If you have any queries, please participate in our Forum or by leaving your comments below.
------------------------------------------------------------------------------------------------------------------------------------------------------------------

Thursday, March 27, 2014

How to Override List Price on Sales Order

Apps Version 12.1.3

Suppose you have a requirement from your client to manually override the list price on sales order line.

To implement the solution, you need to set the "OM: Discounting Privileges" to Unlimited and uncheck the Enforce List Price on transaction types to none.

You don't need to enter any manual modifiers

Some time even after setting above option you get the the online discounting error. in that case just go to transaction type and check uncheck the Enforce List Price.

OM: Discounting Privilege Enforce List Price Apply Manual Adjustment?
Full Yes No
Full No Yes
Unlimited Does Not Matter Yes
Non-overridable Yes No
Non-overridable No Yes
None Does Not Matter No


Thanks
Mandeep

Tuesday, March 25, 2014

Complete Back-to-Back Sales Order Cycle In Order Management


B2B or Back to back order flow is used to source material from vendor after demand is raised. System will automatically fire a requisition when material is not available in stock and Requisition is converted to a purchase order for material procurement. Lets have a look at complete setups and test cycle. This post will also covers the seeded Order To Cash Flow in Order Management.

Setup Steps
  • Define Customers
  • Define Item
  • Assign item to a price list
  • Sourcing rules > this is optional setup. we are not going to use this in our test case.

Step 1) Define Customer

For our test case we are going to use "w_Enterprise Builders" as our customer. customer setup we will cover in separate post.


Define Customer for B2B cycle
Define Customer

Step 2) Define Item

Second Step is to Define the item and assign it to required organization

Please create a item "Car A" and assign it organization M1. You can use the template "Purchased Item" for the same.

Define Item for B2B
Define Item for B2B Cycle


But Here make sure some attributes like Stockable, Transactable, Purchased, Purchasable, Customer Order enabled etc are ticked as shown in below screenshot.

Also most important setup is to tick "Assemble to Order" in Order Management Tab as B2B Process use ATO process workflow and also make sure in general planning tab, Make or Buy should be selected as Buy. 


Item Attributes for B2B item


Assign it org M1.


Step 3) Assign this Item to Corporate Price list

  
Third step is to assign this item to a price list. we are using Corporate Price list.

Assign Item to Price List


Please note I have given price as 10 on price list which is different from list price mentioned on the item


Test case


Step 1) Create a Sales order for customer "w_Enterprise Builders" and make sure the warehouse is selected as M1

Create a Sales Order


In Others Tab, select Warehouse as M1.


Now move to line Items and add item "Car A". You will see price of the item will default from Price list as 10.


Also Make sure the line ATO flag is ticked and source type on Shipping tab is Internal.


Save you work and progress the order


 You will see the status of sales order line will change to "External Req Requested"


Now run the requisition import. you can run it from both purchasing or Order management responsibility. Here give import source as "CTO" rest keep as default

Import Requisition
Import Requisition

On successfully running of this request you will can see number of approved requisition created as 1 in output of the request. requisition number you can find from tools>reservation details>supply.

also sales order status is "External Requisition Open"


Our requisition number is 14818


Now navigate to PO responsibility and see the requisition


Use auto create form to convert this requisition into a PO.


AutoCreate PO
AutoCreate PO


Po number created is 6809. Now approve this PO


Sales order line status will now be "PO open"


Make receipt against this PO

Receive B2B PO
Receive B2B PO

after receiving and delivery so line Status will change to "Awaiting Shipping"


Now using release sales order form, release the order for  picking on shop floor

Release Sales Order
Release Sales Order

In shipping tab, please select auto pick confirm as No. If you select it as yes, the move order will be transacted automatically


In inventory tab, specify warehouse as M1 and keep auto allocate as Yes. you can not select auto allocate as no if the auto pick conform is selected as yes. auto pick confirm and auto allocate both related to move order.


Click concurrent. Line status on shipping transaction form will change to transact move order.


 Move order number generated is 4701038. copy this move order number and navigate to inventory  responsibility to transact move order


Transact Move Order
Transact Move Order

On successful completion of this step, shipping transaction form line status will change to pick confirmed and next step will be ship confirm


Now click on delivery tab and select ship confirm

Ship Confirm
Ship Confirm


Click on on confirm delivery form

Ship Confirm
Ship Confirm

A message will be displayed confirmation


See if ITS request got completed


Sales order line will change to shipped on completion of ITS request


Now run workflow background process to interface the data to AR and create invoice


Thanks
Mandeep


Disclaimer

All content provided on this blog is for informational purposes only. The owners of this blog makes no representations as to the accuracy or completeness of any information on this site or found by following any link on this site. All trademarks, trade names, service marks, copyrighted work and logos referenced here - belong to their respective owners.If you want to report any content that is violating copyright law and you want us to remove it, please contact us.

Featured Post

Complete Oracle P2P cycle