Monday, April 28, 2014

MWA/MSCA Personalizations in Warehouse Management System (WMS)

MWA/MSCA Personalizations in Warehouse Management System (WMS)

Form Personalizations was first  introduced in 11.5.10 and now integral part of E Business suite. To perform personalization you don't need major coding skills and they take effect immediately. So they can be used to accommodate changing business needs without much involvement of tech members. They work on site. responsibility and user levels.

Mobile personalization is available for Inbound transaction like Receipt, Put away and Outbound Transaction like Pick, Ship Confirm etc

MSCA Personalization support following pages

1. Mobile PO Receipt page
2. Mobile PO Receipt Information Page
3. Putaway Drop Page
4. Item Load Page
5. Move Any LPN page
6. Manual Load Page
7. Update LPN Page
8. Pick Load Page
9. Pick Drop Page
10. LPN Ship Page
11. Mobile Ship Confirm Page
Source : Oracle Metalink

Steps to Enable Personalization on MSCA

Lets Take an example of making PO receipt page and make Line Number & LPN number Mandatory and "To Loc" locator name to "Locator"


Step 1) Enable Profile options using sys admin responsibility

MWA: Enable Personalization: This profile option controls the enabling/disabling of personalization. If Yes, it means personlization is enabled.

MWA: Cache Personalized Metadata : This personalization Control whether you need to bounce the MWA server before a personalization take effects. its recommended in production instance to improve the performance

we will set these options at User level and Lets take an example of my user id (Apps_user) on vision instance

As this is not production environment we will set MWA: Cache Personalized Metadata as NO and to enable personalization we will set MWA: Enable Personalization as Yes


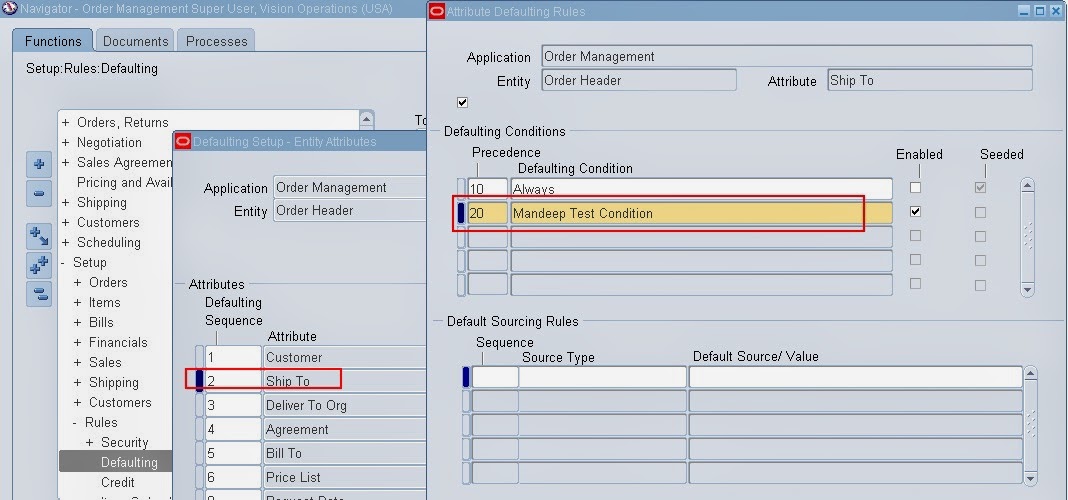
Step 2) Now using Whse Mgmt Super User, Vision Operations (USA) Navigate to MWA Personalization Framework and query for Mobile PO Receipt Page and Click ON Personalize page


A new page will be displayed as below


Click on the pencil box next to each filed to personalize it

Step 3) Lets take Po Line number first. Click on The pencil Edit Button


In the last field "Required""  where originally it was NO, we made it Yes. Save your work

Similarly for LPN, Make it as Yes and Apply the changes


Step 4) Now click on "To Loc" Pencil edit button.


In Prompt, Change the Function as "Locator" which was originally inherit as "To Loc"

Save the changes.

This completes our Personalization
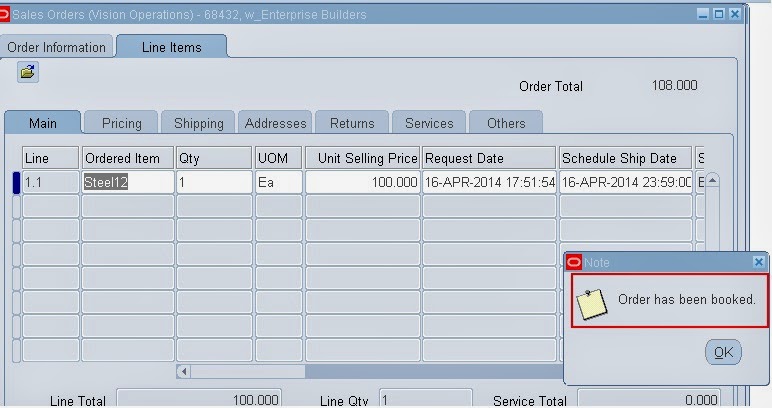
Test Case

Now you don not need to bounce the MWA server to take this effect as we have set MWA: Cache Personalized Metadata to NO. Lets check the MSCA page


You can see Line Num is now mandatory same as LPN number and To Loc is now changed to Locator

Thanks
Mandeep

How To Enable Personalization On OAF Page

How To Enable Personalization On OAF Page


To Enable Personalize Page Link on the OAF pages, we need to set Three profile Options.


These profile options are


Thanks
Mandeep


Thursday, April 24, 2014

How to Launch Change Organization form before Running the Request/Reports

How to Launch Change Organization form before Running the Request/Reports

Sometime it happens we directly run a request going in Requests without selecting any Organization (not through View>requests but in the Menu> Request form). This request either error out or give you an error before running to select a org parameters

The issue occurs because report parameters has an organization id parameter but its not displayed and it refer PO: MFG Organization ID profile option.

Lets take an example of "Item Statuses Report" of inventory

When you try to run this report you will find that its giving an error to select a org before running it.


Now if you run same report after selecting an Org from change org form you will not get any error


This is happening because providing Organization is mandatory before running such reports. If you check concurrent program's parameter, you will find that Organization is a required parameter but its not displayed.


One solution is to make it displayed and you need to find out and perform same action for all the other similar reports.

Second solution is whenever we run the requests Change Organization form automatically displayed and ask us to select an Org.

To achieve the same, we need to assign parameter USE_ORG="Y"  to function assigned to report submission

Please follow below steps

Step 1) Navigate to sysadmin and query for the responsibility from which you are submitting the report


Note down the MENU name : INV_NAVIGATE

Step 2) Now navigate to Application>Menu and query for above Menu name


Note down the Function name : View All Concurrent Requests for Inventory

Step 3) Navigate to Application> Functions and query for above function


In the Form Tab, in Parameters add USE_ORG="Y"

Save your work

Now whenever you run the request from Inventory>Requests it will first pop up the change organization window and you will not face the problem while running the requests.


Thanks
Mandeep

Wednesday, April 23, 2014

Sales Order Defaulting Rules

Sales Order Defaulting Rules

Defaulting rules in Order Management determine how certain fields on sales order headers or sales order lines level will default.

Oracle apps provide both seeded and user defined defaulting rules. You can use defaulting condition templates to built your own rules and conditions to default these fields.

Navigation: OM>SetUps>Rules>Defaulting

A Defaulting rule Consists of following

  1. Defaulting Condition
  2. Precedence
  3. Default Source/value
  4. Source Type
  5. Sequence
Defaulting Condition


As the name suggest, this is the condition which validated at the time of defaulting. It is the first filter validated before a defaulting rule is applied.

Always: is the generic condition which is seeded and generic one.

You can use defaulting condition templates to define new conditions. We have defined a condition that when Warehouse is V1. So when where house is V1 condition is met we can default various filed.


Precedence

Precedence as name suggest, is the priority in importance. Lower the precedence, higher is the priority.


Here in above case Always has Higher priority than our condition "Mandeep Test Condition" as the precedence is lower.

Default Source/ Value

Default Source/Value is the value which system is going to get or default for the sales order header Customer field.

Here in above case we want when warehouse is V1, then ship to should default from sales agreement header values.


Source type

Source type is the type of the source from where the value will be defaulted


Reference  :  Oracle Metalink

Sequence

In Defaulting rules, sequence work as Precedence. Its the order in which defaulting take place. If same sequence then alphabetical order come into place


Thanks
Mandeep
------------------------------------------------------------------------------------------------------------------------------------------------------------------
Please share this knowledge with your friends and subscribe at our blog for more updates. If you have any queries, please participate in our Forum or by leaving your comments below.
------------------------------------------------------------------------------------------------------------------------------------------------------------------

Tuesday, April 22, 2014

How to Assign a Concurrent Program to a Responsibility

Suppose you want to run a Program, lets take an example of  "Autoinvoice Import Program" from Order Management Super User, Vision Operations (USA)

Navigate to this responsibility > View> Requests>Submit a new request>single Request

and enter "Autoinvoice Import Program"


You will not able to find that concurrent program in the list of value as this program is not yet attached to the Request Group of the responsibility "Order Management Super User, Vision Operations (USA)".

To Achieve the same follow below steps

Step 1) Find out the request Group attached to a responsibility

Using sysadmin navigate to Security>Responsibility> Define and query for "Order Management Super User, Vision Operations (USA)"


Note the request group Name: OM Concurrent Programs

Step 2) Now Navigate to Responsibility> Request


Query for OM Concurrent Programs

Step 3) Insert a new line and add Program "Autoinvoice Import Program" in it


Save your Work

Now go to "Order Management Super User, Vision Operations (USA)" and try running Autoinvoice Import Program. You will find the request in the List of values


Thanks
Mandeep

------------------------------------------------------------------------------------------------------------------------------------------------------------------
Please share this knowledge with your friends and subscribe at our blog for more updates. If you have any queries, please participate in our Forum or by leaving your comments below.
------------------------------------------------------------------------------------------------------------------------------------------------------------------

Monday, April 21, 2014

ABC Analysis

ABC Analysis

As per Oracle Inventory user guide "ABC analysis is a method of determining the value of items in your inventory, ranking your items according to a criterion and then grouping items into classes. "ABC" refers to the rankings you assign your items as a result of this analysis, where "A" items are more valuable than "B" items and so on."


To perform ABC analysis, the setups Steps are
  1. Define ABC compile
  2. Define ABC Classes
  3. Define ABC Group
  4. Define ABC Assignments
  5. Update ABC assignments
  6. Run ABC assignments report
Detailed Setup Steps are as follow. Use "V1"Inventory Org

Step 1) Define ABC Compile. Navigate to Inventory>ABC Codes>ABC Compile>Click New

#Give a unique ABC Compile name like "Mandeep Compile"

#In Content scope select organization if you want to do ABC ranking for all items assigned to this inv org V1. If you select Subinventory, then you need to provide a subinventory name and ranking will be done for the items define in item/subinventory window. In our case, lets take content scope as Organization.


#In Compile specification has a field called Criterion and there are 15 Choices in the list. Compile criterion used to rank all the item based on the selected value and assign ABC classes based on this.

Some of the lovs are defined below.

Ref:  http://docs.oracle.com/cd/A60725_05/html/comnls/us/inv/abcdef01.htm#r_critfld


In our case we will take 3rd choice: Historical Usage Value

# Take cost type as Frozen
# Forecast field will only get enabled if you have selected  " Forecasted usage quantity or Forecasted usage value". In that case you also need to enter Plan name.
# Enter a start and end date for the criterion

# Valuation scope used to determine the ranking of items. You must select organization if you have selected the organization in content.


After doing this setups, click on "Compile button" to run compile. This will fire a request to determine the values of each item assigned to this org and then use this to generate ABC Descending Value Report and then you can use this to assign item to ABC classes.


After this run "ABC Descending Value Report"


Step 2) Now define ABC Classes. Navigate as per screenshot below


ABC classes used to group item based on the valuation we determined in step 1


Step 3) Now define ABC Assignment groups


Assignment group assign the ABC classes with ABC compiles. you can also assign item to ABC Classes.

navigate as shown in below screenshot. Enter a  unique name in Group Name and assign Compile.


Now click on Group Classes and assign the classes which we have defined in step 2


Step 4) Click on Assign item Button to assign item to ABC classes and ABC Group


Here specify the cut of points for each ABC class. each ABC class should have at least one item assigned to it . You can mention sequence from descending value report or use inventory value or % of items or Value.

Here as it is vision instance values does't look similar but in real scenarios its really different.

Save your work. A request "Define ABC assignments" will be fired

Optionally you can use update assignments

Step 5) Now you can run "ABC assignments report"


Sample output is below


Thanks
Mandeep

------------------------------------------------------------------------------------------------------------------------------------------------------------------
Please share this knowledge with your friends and subscribe at our blog for more updates. If you have any queries, please participate in our Forum or by leaving your comments below.
------------------------------------------------------------------------------------------------------------------------------------------------------------------

Friday, April 18, 2014

Supplier Scheduling Tables

Supplier Scheduling Tables


Reference : Oracle Supplier Scheduling Technical Reference Manual

Thanks
Mandeep

Wednesday, April 16, 2014

Buy One Get other item Free

Promotions

Lets create a promotional setup in Advance pricing for "Buy One Get other item Free or get 50% discount On other Item"

Setups Steps


Step 1) Create 2 item "First Item" and "Free Item".
Step 2) Enter both items in Price list with price as 100 for both of them


Step 3) Now Navigate to Modifier> Modifier setups and enter header information Like type as Promotion, Currency as USD, enter any number u like and check Active and Automatic. Optionally you can provide start and end dates


Step 4) Now enter line level information. Modifier number will come automatically. Select Type as Promotional Goods

Pricing Phase as "List Line Adjustment" and slect product attribute value as "First Item" and as this is recurring discount so you can select Break type as Recurring. Values are between 1 to 1000 only ie. if order qty is between these values only then item this modifier is applicable


Now click on Define Details

Step 5) in this under Get please enter free Item details. Application method is percent and give value as 100% i.e. its totally free. if you provide the value as 50% i.e. that means there is 50% discount on second item

save you work

Step 6) Run "QP: Maintains the denormalized data in QP Qualifiers".


Test case

Enter a sales order for First Item.


when you save the Sales order, you will get a message that a new line has been added for free item

Click OK

same way if you specify 50% value in Define Details, customer will get 50% discount on second item. you can play around with this and create your own scenarios. Please let me know if you have any specific question.

Thanks
Mandeep

------------------------------------------------------------------------------------------------------------------------------------------------------------------
Please share this knowledge with your friends and subscribe at our blog for more updates. If you have any queries, please participate in our Forum or by leaving your comments below.
------------------------------------------------------------------------------------------------------------------------------------------------------------------

How to Apply and Remove a Hold Source

How to Apply and Remove a Hold Source

Suppose you want to hold all current and future sales order for a Customer. to do so you have to create a hold source based on Customer and select conditions to hold all existing and future sales order for this customer.

Lets create a Order Source. Open Sales order Form and Navigate to Tools> Create Hold Source


Enter the criteria as shown in above screenshot. Previous to this step we have defined the hold named "Mandeep" which we Work Flow item is: OM Order Header and workflow activity: Book Order.

Now click on Hold Name


Click on Apply Hold. You will receive a message the Hold applier successfully

Now try to create a sales order for this customer using Order Management Super User responsibility navigate to Orders, Returns > Sales Orders

Enter sales order header for this customer. Click on Lines Item, you will get a error  'Hold Applied against order based on Customer'


Enter the line, save it and click on BOOK and receive the error in the Process Message form:  'A hold prevents booking of this order.'


You can see order will remain in entered state

Now after few days you want to Remove this hold source


Navigate to Order organizer form and click on Hold information > Hold Source


Query for your Hold based on Hold Name


To Release this hold you need to put a reason and then click on Release button

You will get a message that hold release successfully. Click OK


Now if you try to book our previous order you will face no issue


Thanks
Mandeep

------------------------------------------------------------------------------------------------------------------------------------------------------------------
Please share this knowledge with your friends and subscribe at our blog for more updates. If you have any queries, please participate in our Forum or by leaving your comments below.
------------------------------------------------------------------------------------------------------------------------------------------------------------------

Disclaimer

All content provided on this blog is for informational purposes only. The owners of this blog makes no representations as to the accuracy or completeness of any information on this site or found by following any link on this site. All trademarks, trade names, service marks, copyrighted work and logos referenced here - belong to their respective owners.If you want to report any content that is violating copyright law and you want us to remove it, please contact us.

Featured Post

Complete Oracle P2P cycle