Showing posts with label Purchasing. Show all posts

Monday, July 28, 2014

Complete Oracle P2P cycle

Lets do a complete P2P Cycle

Step 1) Create Item
Step 2) Create Requisition and Approve it
Step 3) Auto Create RFQ
Step 4) Create Quotation
Step 5) Auto Create PO and Approve it
Step 6) Receipt
Step 7) Auto Invoice Generation (Remember Pay on Receipt should be checked on vendor site before creation of purchasing document and vendor site must be a pay site). Or you can manually create an invoice by using match option on Invoice entry form
Step 8) Validating Invoice and Accounting Creation
Step 9) Make Payment and Create accounting for payments
Step 10) Payables Transfer to General Ledger

Step 1) Lets Create an Item using Purchased template

Navigate to PO> Item> Master Item

Oracle P2P cycle
Item Creation


Step 2) Create a Requisition for this Item and Approve the same

Oracle P2P cycle
Requisition Creation


Tables Involved here. Also refer PO Data Flow 

PO_REQUISITION_HEADERS_ALL
PO_REQUISITION_LINES_ALL

PO_REQ_DISTRIBUTIONS_ALL

Step 3) Auto Create an RFQ from this requisition

Navigate to PO> Auto Create and query for the requisition # 14930.

Select Document type as RFQ

Oracle P2P cycle
Auto Create RFQ


Select RFQ as Standard RFQ


Click Create


Click on Supplier and add suppliers who you want to send this RFQ


You can also specify Price breaks and terms

Now change the status of this RFQ active to send it to suppliers


Step 4) Create Quotation

Query RFQ > Tools> Copy Document

Oracle P2P cycle
Create Quote


Click OK


Now please remember, standard quotation can only be converted to Blanket Agreement through Tools> Copy Document otherwise use AutoCreate form and Requisition to create standard PO.

Bid Quotations can be converted to Standard PO. You can even change the type of quotation here.

Step 5) Create PO


A new Standard PO # 6930 got generated. Approve it


Tables Involved.Also refer PO Data Flow
PO_HEADERS_ALL
PO_LINES_ALL

PO_DISTRIBUTIONS_ALL

Step 6) Receive the PO


Tables Involved.
RCV_SHIPMENT_HEADERS
RCV_SHIPMENT_LINES
Also refer PO Data Flow

Step 7) Auto Invoice Generation

You can see the "ADS  (Pay On Receipt AutoInvoice)" run automatically because of supplier level setups.

Remember you pay on receipt should be checked on vendor site before creation of purchasing document.


Step 8) Go To Payable responsibilty and click on Invoice> inquiry> Invoice


Click on Action > Validate


Also Manually Approve the invoice

Now again click on Action > Create Accounting

 You will see a successful message


You can also see from tools>View Accounting events

Step 9) Make Payments and create Accounting for Payments

Now payment Click on action and select "Pay in Full"


Select Bank account, Payment Process Profile and Payment Date and save you work


Now create accounting for payments Click Actions > select Creating accounting


A confirmation message will be displayed


Step 10) Run  "Transfer Journal Entries to GL" request


Transfer Journal Entries to GL


Thanks
Mandeep

Thursday, June 12, 2014

Drop Ship Order Flow

Here is a block diagram of Drop Ship Order Flow

Drop Ship Order Flow


Back to Back Order Flow

Please refer below diagram for Back to Back Order flow in Oracle apps


Back to Back Order flow

Tuesday, June 10, 2014

PO Data Flow

PO Data Flow


Thursday, June 5, 2014

Match Approval Level and Invoice Match Option

What is the difference between "Match Approval Level" and "Invoice Match Option" on PO Shipments


Ever wonder whats the difference between Match Approval Level and Invoice match option.


The Invoice Match Option and Match Approval Level both are independent options. you can select one independent of the other.

Match Approval Level: 

Match Approval Level mean Invoice quantity should match with which purchasing document quantity before it can be paid.

Two-way: Purchase Order and Invoice quantities must match within tolerance before the corresponding invoice can be paid.

Three-way: Purchase Order, Receipt and Invoice quantities must match within tolerance before the corresponding invoice can be paid.

Four-way: Purchase Order, Receipt, Accepted and Invoice quantities must match within tolerance before the corresponding invoice can be paid.

Invoice Match Option:

Means Payable must match the Invoice with PO or Receipt.

Purchase Order: Payable must match the invoice to the purchase order

Receipt: Payable must match the invoice to the receipt.


Thanks
Mandeep
------------------------------------------------------------------------------------------------------------------------------------------------------------------
Please share this knowledge with your friends and subscribe at our blog for more updates. If you have any queries, please participate in our Forum or by leaving your comments below.
------------------------------------------------------------------------------------------------------------------------------------------------------------------

Tuesday, June 3, 2014

PO Interface Tables

PO_HEADERS_INTERFACE is used to import Purchase Order's Header Level Information

PO_LINES_INTERFACE is used to import Purchase order's line level information.

PO_DISTRIBUTIONS_INTERFACE is used to import Distribution Level Information

PO_REQUISITIONS_INTERFACE_ALL used to import requisition's information from other applications/Modules.

PO_REQ_DIST_INTERFACE_ALL: used to import requisition's Distribution  information from other applications/Modules.

RCV_HEADERS_INTERFACE is the interface table that stores receiving header information.

RCV_LOTS_INTERFACE : this table stores temporary lot number transaction records for a parent record in the RCV_TRANSACTIONS_INTERFACE table.

RCV_TRANSACTIONS_INTERFACE : stores information about receiving transactions that are waiting to be processed by the receiving transaction processor.

Thanks
Mandeep

Thursday, May 29, 2014

Types Of Receipt Flashcards

Wednesday, May 28, 2014

Vacation Rules

Vacation Rules in Oracle R12

In this post we will see how to create vacation rules when you want to transfer notifications meant for you to your colleague.

The First Step is to login in Oracle and click on Notification summary

Navigate to Suppose Purchasing Super user > Notifications Summary


 Click in Vacation Rules at the bottom of the page


Select Item type for which you want to create Vacation rules. We will take "ALL" for our example. Click Next.


#Enter Start Date from which you want to transfer notifications
#Optionally enter End Date
#Optionally Enter a message which will be displayed with routed notifications.
#In Reassign, select the user name whom you want to transfer the notification
# Select "Delegate Your Response" if you want to delegate all notification approvals to an assistant.
# Select "Transfer notification ownership" if you want to transfer notifications for a specific project to the new manager of that project.

Click Apply


Table Involved : WF_ROUTING_RULES

Note: The key to setting-up a valid Vacation Rule is to ensure the rule is tied to a Username rather then the Full Name of the desired user.  The reason for this is that the Worklist and Notification Summary for the user is linked to their username and not full name record (Reference Metalink)

Suppose a person forgot to create vacation rules then in that case we can also use Management >Forward Documents  or you can reassign it using workflow monitor.

Thanks
Mandeep 

------------------------------------------------------------------------------------------------------------------------------------------------------------------
Please share this knowledge with your friends and subscribe at our blog for more updates. If you have any queries, please participate in our Forum or by leaving your comments below.
------------------------------------------------------------------------------------------------------------------------------------------------------------------

Tuesday, May 27, 2014

AME Setups

This Post is going to describe how to use AME for Requisition approvals. Purchase requisition and Purchase orders can be approved using AME. AME Stands for Approval Management Engine.

We are going to perform the setup steps one by one and see a demo test case. We are going to perform this case on R12.1.3

Setup Steps

1) AME Profile Options
2) Assign AME Roles and Responsibilities
3) Grant Transaction Type Access to User
4) Create New Transaction Types
5) Approval Process Setup
6) Enable AME for Requisition Approval


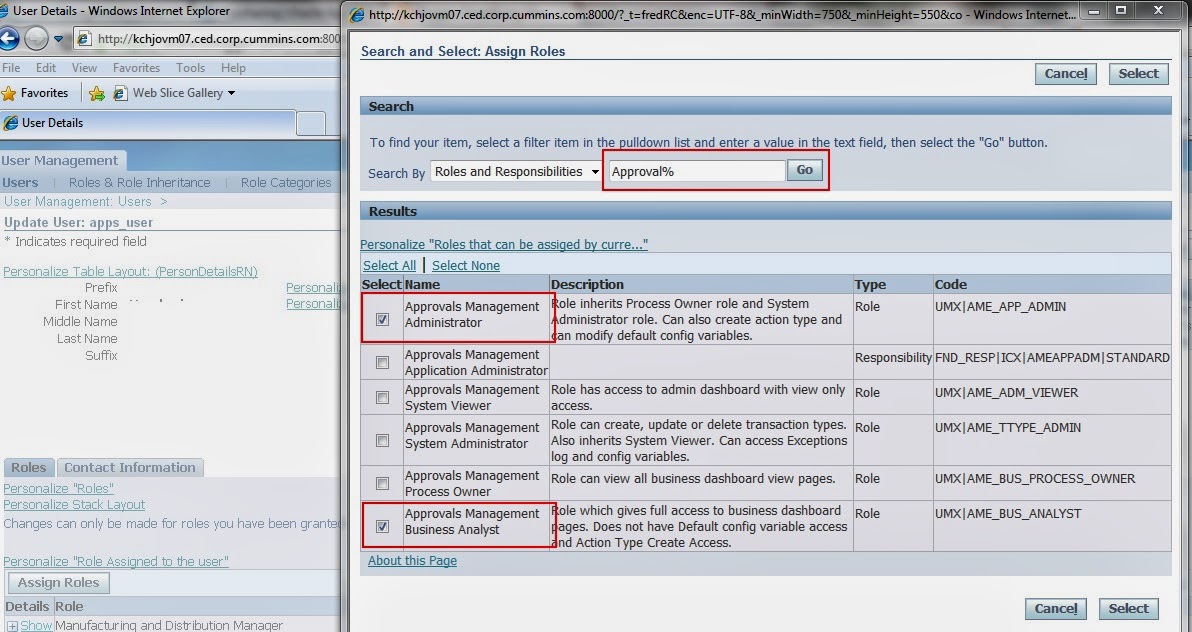
Step 2) Assign AME Roles and Responsibilities

Navigate to User Management Responsibility > Users

Query for the User. In our case its Apps_User


Click on Update and then Assign Roles


Now Query for "Approvals%" and select "Approval Management Administrator" and "Approval Management Business Analyst"


Click Select


Put some justification and click apply. A message will be displayed "You have successfully updated the information "


Step 3) Grant Transaction Type Access to User

Next step is to Grant Transaction Type Access to User.

Navigate to Functional Administrator >Security > Grants> Create Grants


Fill In below Information in the next form

Name = Apps_User Grants
Grantee Type = Specific User
Grantee = Apps_User
Object = AME Transaction Types


Click On next


Data Context Type = All Rows
Click Next


Set = AME Calling Applications

Click Next and review and clicking on Finish will display "Grant '' has been created successfully."

Step 4) Create new Transaction Type

You can use existing transaction type also or can create your own. Lets Create a new Transaction type.

Navigate to Approval Management Administrator (This Responsibility will be available now because it was assigned in step 2) and Click On "Create Transaction Type"


Enter Information as shown below or create your own Transaction type


Click Next, Select Line Item from Drop Down and Click "Go"


Change the Order Number to 2


Post below in the query. I copied it from earlier Requisition approval transaction type.

select prd.distribution_id from po_req_distributions_all prd, 
po_requisition_lines_all prl
where prl.requisition_header_id = po_ame_setup_pvt.get_new_req_header_id(:transactionId) 
and prl.requisition_line_id = prd.requisition_line_id  
and nvl(prl.cancel_flag, 'N') = 'N' 
and nvl(prl.modified_by_agent_flag, 'N') = 'N' 
order by prd.distribution_id 

Click on Validate, a message will be displayed "The query is valid" and now click on "Apply".

Click on Next and enter the details as shown in below screenshot.


Click on Validate Button after entering each value. Below are the value. I copy pasted from seeded transaction type defined

ALLOW_DELETING_RULE_GENERATED_APPROVERS=
select decode(PO_AME_SETUP_PVT.is_system_approver_mandatory(:transactionId), 
'N', 'true', 'false') 
from dual 

ALLOW_REQUESTOR_APPROVAL=
select decode (PO_AME_SETUP_PVT.can_preparer_approve(:transactionId),
'Y', 'true', 'false') 
from dual

WORKFLOW_ITEM_KEY=
select wf_item_key  from   po_requisition_headers_all where  requisition_header_id = po_ame_setup_pvt.get_new_req_header_id(:transactionId)


WORKFLOW_ITEM_TYPE=
select wf_item_type from   po_requisition_headers_all where  requisition_header_id = po_ame_setup_pvt.get_new_req_header_id(:transactionId)

Now Click On next and Finish Button. A confirmation message will be displayed as "Transaction type Mandeep Purchase Requisition Approval has been created successfully."

Step 5) Approval Process Setup

Next is to define Attributes, Conditions, Actions Types, Approval Group, Rules etc

Navigate to Approval Management Business Analyst > Business Analyst Dashboard

In Approval Process Setup, Query for Transaction Type as "Mandeep Purchase Requisition Approval".


Attributes:

Next Click on Attributes. Click On "Use Existing Attributes"


Now select the attributes as shown below and click Go


Select REQUISTION_TOTAL and Click On Continue


Select Usage Type as Dynamic and Copy below sql there

SELECT nvl(SUM(decode(order_type_lookup_code, 'RATE', amount, 'FIXED PRICE', amount, quantity * unit_price)), 0), po_ame_setup_pvt.get_function_currency(max(requisition_header_id)), po_ame_setup_pvt.get_rate_type(max(requisition_header_id)) from po_requisition_lines_all where requisition_header_id = po_ame_setup_pvt.get_new_req_header_id(:transactionId) and nvl(cancel_flag, 'N') = 'N' and nvl(modified_by_agent_flag, 'N') = 'N' 

Click on Validate and then Finish will display a message "Attribute REQUISITION_TOTAL has been created successfully."

Similarly do same for Item category. Click on Use Existing Attributes. Select Attributes as shown below


Select Item Category and click Continue


Select Usage Type as Dynamic and Copy below sql there

select mck.concatenated_segments from mtl_categories_b_kfv mck, po_requisition_lines_all prl, po_req_distributions_all prd where mck.category_id = prl.category_id and prl.requisition_line_id = prd.requisition_line_id and prl.requisition_header_id = po_ame_setup_pvt.get_new_req_header_id(:transactionId) order by prd.distribution_id


Also Add Below Attributes for selecting action types

TRANSACTION_REQUESTOR_PERSON_ID(Required for Supervisory level Action Type)


select nvl(PREPARER_ID, 0) from po_requisition_headers_all where REQUISITION_HEADER_ID = po_ame_setup_pvt.get_new_req_header_id(:transactionId)

And Now add

ALLOW_EMPTY_APPROVAL_GROUPS(Required for approval-group chain of authority Action Type)


Conditions:

Next is to specify Conditions. Click on Setups> Conditions > then click on Create


Condition for Item Category

Condition for Requisition Total


Action Types

Now click on action types and select use existing actions

Select below value and click Continue

  • Supervisory level
  • Approval-Group Chain of authority


and click on Finish "The selected action types have been added successfully."

Approver Groups

Now click on Approver Groups and click on Create Button.

Enter Name, description , Order number, Voting Method. and add approvers


Click Apply. Similarly create other approver groups.


Give order number

AME Rule Setups

Now ;lets use condition and approver groups to create rules. Click on Rule


Click on Create.


Enter Rule details like Name, End date will automatically come and you can change it also. Click Next and Add Conditions.


Select Conditions which is created earlier or use from exiting conditions. Click Continue. You can add more conditions here and then click next and add actions


Click Next and Review


Click on Finish "Rule Supervisior has been created successfully".

Similarly create rule for Item Category Condition


Click Finish "Rule Item Category has been created successfully."

Step 6) Enable AME for Requisition Approval

Next step is to enable AME for requisition approval.

Navigate to Purchasing super user>Setup>Purchasing>Document Type and search for Purchase requisition


Add "Mandeep_Purchase_REQ" in Approval Transaction Type and save

This complete our AME setups.


Thanks
Mandeep


Disclaimer

All content provided on this blog is for informational purposes only. The owners of this blog makes no representations as to the accuracy or completeness of any information on this site or found by following any link on this site. All trademarks, trade names, service marks, copyrighted work and logos referenced here - belong to their respective owners.If you want to report any content that is violating copyright law and you want us to remove it, please contact us.

Featured Post

Complete Oracle P2P cycle