Wednesday, April 16, 2014

How to Apply and Remove a Hold Source

How to Apply and Remove a Hold Source

Suppose you want to hold all current and future sales order for a Customer. to do so you have to create a hold source based on Customer and select conditions to hold all existing and future sales order for this customer.

Lets create a Order Source. Open Sales order Form and Navigate to Tools> Create Hold Source


Enter the criteria as shown in above screenshot. Previous to this step we have defined the hold named "Mandeep" which we Work Flow item is: OM Order Header and workflow activity: Book Order.

Now click on Hold Name


Click on Apply Hold. You will receive a message the Hold applier successfully

Now try to create a sales order for this customer using Order Management Super User responsibility navigate to Orders, Returns > Sales Orders

Enter sales order header for this customer. Click on Lines Item, you will get a error  'Hold Applied against order based on Customer'


Enter the line, save it and click on BOOK and receive the error in the Process Message form:  'A hold prevents booking of this order.'


You can see order will remain in entered state

Now after few days you want to Remove this hold source


Navigate to Order organizer form and click on Hold information > Hold Source


Query for your Hold based on Hold Name


To Release this hold you need to put a reason and then click on Release button

You will get a message that hold release successfully. Click OK


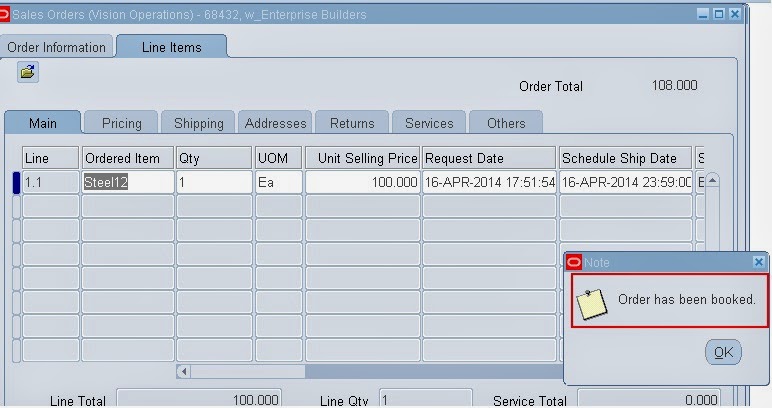
Now if you try to book our previous order you will face no issue


Thanks
Mandeep

------------------------------------------------------------------------------------------------------------------------------------------------------------------
Please share this knowledge with your friends and subscribe at our blog for more updates. If you have any queries, please participate in our Forum or by leaving your comments below.
------------------------------------------------------------------------------------------------------------------------------------------------------------------

Monday, April 14, 2014

Display a Message using Form Personalization

Display a Message using Form Personalization

Form Personalizations was first  introduced in 11.5.10 and now integral part of E Business suite. To perform personalization you don't need major coding skills and they take effect immediately. So they can be used to accommodate changing business needs without much involvement of tech members. Here below is a demonstration of a simple personlization on Standard Purchase order.

Lets display a warning message that a Valid "Contract Purchase Agreement" exists for this Supplier when Creating a "Standard PO" for that supplier

Lets Take Supplier as "AccessMicron"

Step 1) Open PO Form and Navigate to "Personalize" as shown in below screenshot


Step 2) Trigger Event: WHEN-NEW-ITEM-INSTANCE
Trigger Object: PO_HEADERS.VENDOR_SITE_CODE
Condition: (:PO_HEADERS.DOC_TYPE_NAME='Standard Purchase Order') and (:PO_HEADERS.VENDOR_NAME='AccessMicron')

Actions: Message
Message Type WARN
Message Text :
a Valid "Contract Purchase Agreement" exists for this Supplier


Save your Work

Step 3) Create a Standard PO for this supplier. A warning message will be displayed


Thanks
Mandeep

------------------------------------------------------------------------------------------------------------------------------------------------------------------
Please share this knowledge with your friends and subscribe at our blog for more updates. If you have any queries, please participate in our Forum or by leaving your comments below.
------------------------------------------------------------------------------------------------------------------------------------------------------------------


Oracle Min Max Planning

Min Max Planning


Min Max planning is one of the inventory planning method where when quantity reaches min level, system auto create purchase requisition to order material from supplier or can create a move order to transfer material from other Sub-inventory based on our setups. Min Max planning can be done both at sub inventory level or Inv org level. In org level the item quantity is checked in all subinventories

Lets see how to do Min Max Planning at Subinventory level

Setups
1) Create a Min Max Item. take template of purchase item.
2) Set planning method as Min Max in General Planning tab.
3) Navigate to Setup>Organization>Subinventories. Here in Item/subinventory specify Min and Max Quantities and Min /Max order Quantities.
4) Specify a Source in General Planning tab. We will take source as Subinventory to create a move order when demand arises.

Here system see on hand balances, Supply like PO and demand like Sales order at subinventory level

Step 1) Create a "MIN MAX" item and apply Purchase Item template

Item Setup Min Max Planning

Step 2) Navigate to General Planning tab, Here specify the planning method as Min Max Planning. you can specify the Min Max quantities and Min Max Order Quantities but when planning at subinventory level this will get overridden by the values at subinventory level.

Item Setup Min Max Planning

Step 3) Now go to Subinventory Window and Query for "Stores" subinventory.

Min Max Planning Setups

Click on Item/Subinventory Button

Step 4) Here First in Planning tab enter Item and specify min max quantities. Also Tick Min max planning check Box.

Min Max Planning Setups

Step 5) Now go to next tab "Order Modifiers". Specify a Minimum and Maximum order Quantities.

Min Max Planning Setups

Step 6) Now navigate to next Tab  "Sourcing". Here mention sourcing subinventory

Min Max Planning Setups

Note: Other methods of Sourcing are Suppliers and Inventory. If you choose "Supplier" system will create a Purchase requisition and if you choose "Inventory" system will create an internal requisition.

After that if you want you can optionally specify the lead times.

Test case

Step 1) After doing setups please perform miscellaneous transaction to receive some quantities in subinventory FGI for MIN MAX item


Step 2) Now run "Min-max planning report". You can choose the parameters as shown in below screenshots. Restock Option should be Yes.

Min-max planning report

Min-max planning report


Step 3) View report Output

Min Max Planning Report


You can see the values shown in report are from subinventory level and not from master item level.

Reorder quantity is 1000.

If something fails, you can run "Requisition Import Exception Report" to find out the errors.

Step 4) Now Navigate to Transact Move order  transact move order


Thanks
Mandeep
------------------------------------------------------------------------------------------------------------------------------------------------------------------
Please share this knowledge with your friends and subscribe at our blog for more updates. If you have any queries, please participate in our Forum or by leaving your comments below.
------------------------------------------------------------------------------------------------------------------------------------------------------------------

Friday, April 11, 2014

Consigned Inventory Flow in R12

Consigned Inventory Flow in R12


Setup steps


Step 1) Create an Item "CONSIGNED". Apply Purchasing template. Also tick "Use Approved Supplier" in purchasing tab


Step 2) Create a Blanket Purchase Agreement for this item. Take supplier as "Abbott Laboratories, Inc." and site as "CORP HQ". Make sure pay on "Use" is ticked in Supplier setups


Step 3) Create an ASL for this Item and Supplier combination. On Item-attributes form assign above blanket Agreement and  in Inventory tab tick the Consigned from Supplier.


Step 4) Define Consigned\VMI Consumption rules in inventory. Navigate to Setup>Transactions>Consigned\VMI Consumption. Here take From Sub-inventory as "Stores" and To Sub-inventory as "FGI"


Note : The weight value allows you to set the processing order. For example, if two transactions satisfy the transaction criteria, the system processes the transaction with the highest weight.

Test Case


Step 1) Create a Standard PO and Receive the material. Please keep receipt routing as Direct


You can notice Consigned flag on Shipment line is checked automatically. All consigned PO is always closed for invoicing

Step 2) Now go to iSupplier Portal and create an ASN for this PO 6356


ASN1234

Step 3) Now receive against this ASN


Step 4) You can check that no accounting transactions created yet


Step 5) Check owning party information


Step 6) Now when we require material we can transfer material from Stores to FGI. Transfer 10 qty


Step 7) Check Material transactions


Step 8) Now run Consumption Advise


Step 9) Now check the consumption advise from the po summary form. consumption advice create a release against the BPA we have created in setup steps. Remember the BPA number was 6355.


You can see you can not open the release i.e. you can not modify the consumption advise. also this release is closed for receiving as material is already received

Step 10) Now log in iSupplier to see consumption advice


You can click on consumption advise and see it

Thanks
Mandeep
------------------------------------------------------------------------------------------------------------------------------------------------------------------
Please share this knowledge with your friends and subscribe at our blog for more updates. If you have any queries, please participate in our Forum or by leaving your comments below.
------------------------------------------------------------------------------------------------------------------------------------------------------------------

Wednesday, April 9, 2014

How to Find the Table name on OAF Page


Step 1) Set the profile option "FND: Diagnostics" at User Level to "Yes"

set FND : Diagnostics


Step 2) Navigate to respective OAF page and Click "About this Page" link at the bottom as shown in below screenshot

Click About this Page


Step 3) Navigate to Page > View Object and click on this. You can see the table name from there.


Thanks
Mandeep
------------------------------------------------------------------------------------------------------------------------------------------------------------------
Please share this knowledge with your friends and subscribe at our blog for more updates. If you have any queries, please participate in our Forum or by leaving your comments below.
------------------------------------------------------------------------------------------------------------------------------------------------------------------
Tuesday, April 1, 2014

Interview Questions : Purchasing, Inventory and WMS

Interview Questions : Purchasing, Inventory and WMS 


1) Difference between physical and Cycle Count?
2) Why can’t we do physical Count as Cycle count?
3) How to achieve Cross Dock for partial quantity or Cross docking for 1 Sales Order and not for other Sales order?
4) How to print label for different supplier during receiving differently?
5) Difference between Planned PO and BPA?
6) Can we auto create standard PO from GBPA same as release created from BPA?
7) How we can assign the tasks to employees automatically?
8) How to query in Warehouse Control Board?
9) Can we copy RFQ on quotations?
10) How mails sent to supplier after approving PO?
11) Types of routing in Receiving?
12) Can we use 2 way on inventory items?
13) In Receiving options, what are the major fields?
14) Approval hierarchy/routing based on similar position/names?
15) How to Auto Print WMS label for one item and not for other?
16) Use of  PO Forward documents in Management?
17) Can we create standard PO by create release functionality?
18) How XML label data sent to printer? I.e. its not printing as shown in XML therefore so how printer print labels?
19) I want to display all 3 thing say item, LPN and Sub inventory in same line. How to achieve that?
20) How to use Advance pricing in Purchasing?
21) Item attribute in MRP and General planning tabs in item setups?
22) is it possible to send notification to all your supervisors in employee supervisor hierarchy?
23) What are basic setups to use MSCA or WMS?
24) Why there is a need of two blanket PO in ASL attributes?
25) How machines assigned to a particular task? is machine is also a resource or only person is a resource? if machine is not a resource how we assign it to a person or task?
26) Type of Label in WMS?
27) Type of label formats in WMS?
28) Reason to select employee supervisor or position hierarchy? advantages and disadvantages of both?
29) If we don't want to use PO functionality? just say create requisition and receive material. is it possible?
30) Is it possible to send notification to all your supervisors in employee supervisor hierarchy ?
31) Difference between min max and reorder point?

I will try to come up with new questions very soon

Thanks
Mandeep
------------------------------------------------------------------------------------------------------------------------------------------------------------------
Please share this knowledge with your friends and subscribe at our blog for more updates. If you have any queries, please participate in our Forum or by leaving your comments below.
------------------------------------------------------------------------------------------------------------------------------------------------------------------

Auto Create Release


Auto Create Releases from requisition is a major feature of Oracle Purchasing. Using  this feature you can convert requisitions generated from multiple sources like Inventory Planning, ASCP or MRP planning, Order Entry, Wip Jobs etc can be converted to blanket releases based on the sourcing rules and approved supplier list. Lets have a look at the setups and Test case. Here we assume Profile Option "PO: Automatic Document Sourcing" set to “Yes”

Step 1) Check Profile option PO: Automatic Document Sourcing and set to “Yes”

Auto Create Releases


Step 2) Create a Buy Item and apply Purchased item Template

Item Creation
Item Creation

Step 3) Create a Blanket Purchase Agreement and Approve it

BPA Creation
BPA Creation

Step 4) Create a ASL for the item in Agreement and assign this BPA in Item-Attribute. keep rest of the attributes as shown in the screenshots

ASL Creation
ASL Creation

ASL Item Attributes
ASL Item Attributes

Step 5) Create Sourcing Rule to default all information

Sourcing Rule Creation

Step 6) Assign this sourcing rule to default sourcing assignment set defined in profile option "MRP: Default Sourcing Assignment Set"


Assigning Sourcing Rule


Test case


Step 1) Create a Purchase Requisition, see how system default Supplier, blanket PO, Price etc on it


Approve the requisition

Step 2) Now run Create Release Program for this Operating Unit. Normally this Program is Scheduled in the system
Create Release Request


You will see a Blanket Release is Generated from the requisition can see the requisition reference in the distribution of the release


Thanks
Mandeep
------------------------------------------------------------------------------------------------------------------------------------------------------------------
Please share this knowledge with your friends and subscribe at our blog for more updates. If you have any queries, please participate in our Forum or by leaving your comments below.
------------------------------------------------------------------------------------------------------------------------------------------------------------------


Disclaimer

All content provided on this blog is for informational purposes only. The owners of this blog makes no representations as to the accuracy or completeness of any information on this site or found by following any link on this site. All trademarks, trade names, service marks, copyrighted work and logos referenced here - belong to their respective owners.If you want to report any content that is violating copyright law and you want us to remove it, please contact us.

Featured Post

Complete Oracle P2P cycle